When you build web applications with for example a Javascript framework as SAPUI5 you cannot make use of all the native functions of a device (like the camera, GPS, health data, etc). First of all because you simply do not get access to all features but secondly since different brand devices (Android and iOS) simply work differently. This is where Cordova gives you the power to write web applications and still use device features on both iOS and android with (almost) one single codebase.

Cordova acts as a container for running a web application written in HTML, CSS and JavaScript, it builds a native (hybrid) application wrapping this web application and allowing you this way access to the device features. So you can run the same web application code on Android, iOS and even on a desktop browser (where you do not have access to the plugin on the desktop in this way).
What will we build
We are going to build a basic cordova application using the microphone to capture your voice into text. Since I work in the SAP area I will use the SAPUI5 framework to build the frontend.
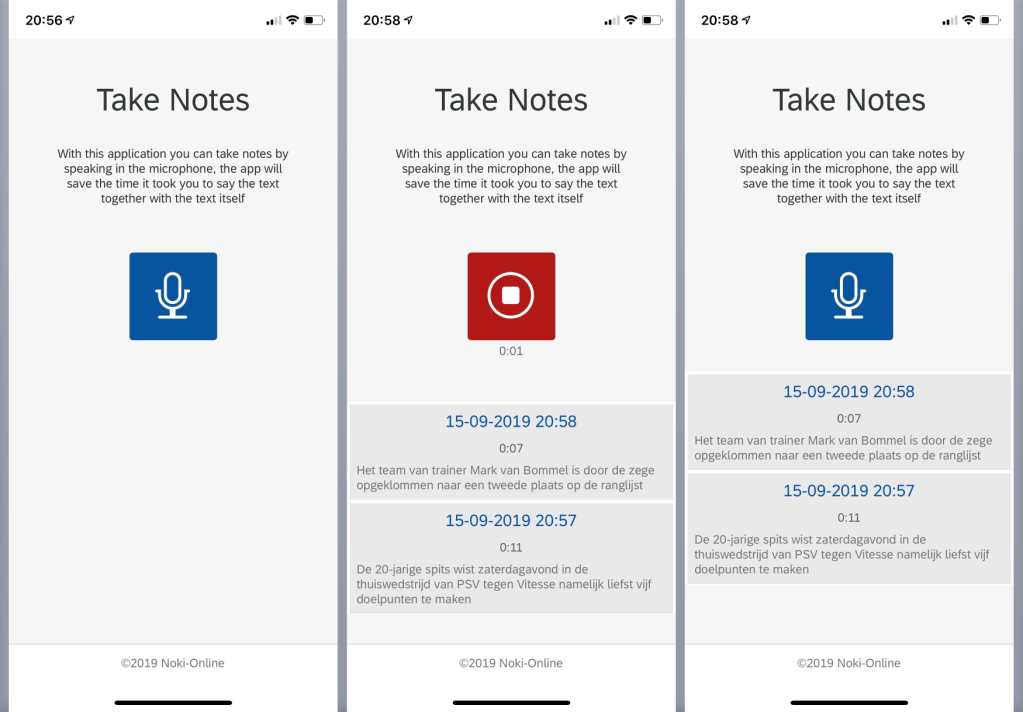
The above screenshots are from iOS, the app will also work on Android but the way the app works is a bit different. The general purpose of the app is to collect text notes through your voice. The UI will be simple, there is a big button which you tap to start recording, on android this will launch a google pop-up and the recording stops when you stop speaking but on iOS you will see a timer running and the button will change in a stop button during recording. The data is for this prototype saved in local JSON models and not in any database.
For testing I also implemented a check in the code to see if the app was started on a mobile device. If you start the app on a web browser you do not have access to the plugin and therefore to the microphone. In this case a dialog pops up where you can type your text and this way you can test all features of the app which do not use the plugins from a web browser without the need to redeploy the app for each small change.
Installation steps
To start with Cordova you first have to prepare your Mac or Windows environment. I will expain the steps for the Mac but the steps on Windows should not differ a lot. First you need to download node.js from https://nodejs.org/en/, I recommend to download the LTS version unless you have a good reason to go for the latest version.
After installing node.js you can use it from the command line, the option #node -v shows the currently installed version. The installation of node.js also includes npm which is the short name for Node Package Manager, you use npm to install the required node packages like cordova.
After the installation you can install cordova through the command “#sudo npm install -g cordova”. The “-g” flag means that you install the package globally on your Mac, without this flag you would only install a package for the current project. You need to add a version number to the command if you want to install a specific version (e.g. “npm install -g cordova@8.0.0)”.
For Android you also need to install a specific SDK depending on the Android version you want to build. You should keep in mind that the Cordova version has a strong relationship between the SDK version. Check the Cordova site for the exact version numbers: https://cordova.apache.org/docs/en/latest/guide/platforms/android/index.html.
You can find the latest available version of cordova by running the command "npm info cordova version"
Now that cordova and NPM are installed you have to prepare your MacBook for developing either iOS, Android or both. For this you should install some extra applications, Android studio, Java 8 SDK and gradle for Android development and Xcode for iOS development.
You can simply install Xcode from the Mac AppStore but also the installations of Android Studio and Java are simple installations. The installation of gradle requires however a bit more explanation, from the url above you download a zip file. After downloading the zip file you have to perform the following actions in the terminal:
# sudo mkdir /usr/local/gradle
# sudo unzip gradle-5.6.2-bin.zip -d /usr/local/gradle/ (version might differ)
Finally install ios-deploy (if you want to build for iOS) with the following command:
# sudo npm install -g ios-deploy –unsafe-perm=true
Check this site for more information about when and why you need to use the "--unsafe-perm=true" flag.
Set Enviroment variables
Now create in the root of your home directory the file ~/.bash_profile (if it does not already exist) and add the following lines to it (when you installed tools on different locations you have to update the paths ofcourse):
export ANDROID_SDK_ROOT=~/Library/Android/sdk
export GRADLE_HOME=/usr/local/gradle/gradle-5.6.2
export PATH=$GRADLE_HOME/bin:$PATH
You can execute the terminal command 'source ~/.bash_profile' to re-apply the environment variables to your current terminal or just start a new terminal to apply the changes.
Create a Cordova Project
After installing cordova you can create your first project, as discussed we will create in this example an SAPUI5 application which uses the device microphone to convert voice to text.
Open a terminal and navigate to the directory where you want to create your project folder. Then use the cordova command to create a new project, the first parameter you provide is the path (where to create the project), then we provide the ID of the project followed by the name of the application.
# cordova create ui5app com.noki_online.ui5app Noki-UI5
This command generates a folder named “ui5app” (the path mentioned) in the folder from where you run the command. In this folder you find the entire Cordova project, the most important files and folders are explained below.
- config.xml: a global configuration file which controls many aspects of the cordova application’s behavior (e.g. the location of the app icons, the supported device orientation, etc).
- package.json: this is the primary location for the platform and plugin info. It contains all the required information to build your project, with this file you can always rebuild your project with all required plugins.
- plugins: all plugins you add to the project will be saved in this folder.
- platforms: you tell cordova for which platform the app should be build, the actual hybrid app project (Android or iOS) gets build in this folder.
- res: here you can store all the images for your app like the icon and splashscreens, you define these locations in the config.xml
- www: by default this is the folder where your web application resides.
Prepare SAPUI5 framework
Now that we have created the basic cordova project framework we will start with adding the necessary files to run the SAPUI5 web application.
Since I work in the SAP area I decided to use an example where we can use Cordova plugins inside a SAPUI5 application. However, it is not the purpose of this blog to explain the SAPUI5 framework itself therefore I prepared a git project on github which you can clone or download as a zip file. You find this git project here: https://github.com/nicolinden/ui5app.git
The project contains a fully working application so if you just want to see it work you only have to clone the project and run the commands “cordova platform add ios” and “cordova platform add android” inside the cloned folder. After this you should be able to run the apps on you mobile phone (assuming you already have a working Cordova environment).
If you want to start from scratch though and follow the steps of this blog, you just download the zip file and replace all content inside your newly created Cordova project (from the previous step) under the “www” folder with the content of the “www” folder of the zip file. This does contain the full web application but the app won’t run unless you also add all the necessary cordova plugins which is explained in the next part of the blog.
Again, this is no blog about creating your first SAPUI5 application so I won't explain all code in the web application in detail. However (don't worry ;-)), I will explain the implementation of the plugin API's and all content relevant to cordova.
Install cordova plugin
The first thing we need to do is install the cordova plugin, currently the plugin folder in the root of your cordova project is empty. To install the voice to text plugin we have to execute the command “#cordova plugin add cordova-plugin-speechrecognition”, this will download the files needed into the plugin folder.
But besides downloading the necessary files, it will also update your package.json file. It will create a dependencies area in this file where it will keep track of all the installed plugins so that building the project will always make sure that the plugins are available.
The package.json file is why you could simply clone the project from git, add the required target platforms and run the app, since the dependencies are stored here Cordova knows which plugins to download.
If you already have the plugins installed but they are not in the package.json yet you can also run "cordova plugin add cordova-plugin-speechrecognition --save" which will only update the content in your package.json
Configure Cordova project
Now that we have a Cordova project containing the web application and plugins we only need to make some small changes so that the app looks a little bit more like a real productive app.
Configure app icons
When you build a custom cordova app it will use the corova logo as icon and splashscreen. That does not look nice ofcourse and I even doubt that Apple will allow the app in the appstore.
So you can create your own custom icon or you can replace it with the icon I included in the git project which is the icon shown below.
So for android development you have to add the following block into the config.xml. The header for android and ios probably already exist with some content, so if that is the case you should put the lines below the existing lines but inside these platform tags.
<platform name="android">
  < .... />
  <icon density="ldpi" src="res/icon/android/icon-36-ldpi.png" />
  <icon density="mdpi" src="res/icon/android/icon-48-mdpi.png"/>
  <icon density="hdpi" src="res/icon/android/icon-72-hdpi.png" />
  <icon density="xhdpi" src="res/icon/android/icon-96-xhdpi.png" />
  <icon density="xxhdpi" src="res/icon/android/icon-144-xxhdpi.png" />
  <icon density="xxxhdpi" src="res/icon/android/icon-192-xxxhdpi.png" />
</platform>
The same applies for the iOS development, copy the lines below into the ios platform section of the config.xml.
<platform name="ios">
  < .... />
  <icon height="57" src="res/icon/ios/icon.png" width="57" />
  <icon height="114" src="res/icon/ios/icon@2x.png" width="114" />
  <icon height="40" src="res/icon/ios/icon-small-40.png" width="40" />
  <icon height="80" src="res/icon/ios/icon-small-40@2x.png" width="80" />
  <icon height="120" src="res/icon/ios/icon-small-40@3x.png" width="120" />
  <icon height="50" src="res/icon/ios/icon-small-50.png" width="50" />
  <icon height="100" src="res/icon/ios/icon-small-50@2x.png" width="100" />
  <icon height="60" src="res/icon/ios/icon-60.png" width="60" />
  <icon height="120" src="res/icon/ios/icon-60@2x.png" width="120" />
  <icon height="180" src="res/icon/ios/icon-60@3x.png" width="180" />
  <icon height="72" src="res/icon/ios/icon-72.png" width="72" />
  <icon height="144" src="res/icon/ios/icon-72@2x.png" width="144" />
  <icon height="76" src="res/icon/ios/icon-76.png" width="76" />
  <icon height="152" src="res/icon/ios/icon-76@2x.png" width="152" />
  <icon height="167" src="res/icon/ios/icon-83.5@2x.png" width="167" />
  <icon height="29" src="res/icon/ios/icon-small.png" width="29" />
  <icon height="58" src="res/icon/ios/icon-small@2x.png" width="58" />
  <icon height="87" src="res/icon/ios/icon-small@3x.png" width="87" />
</platform>
Now that you have updated the config.xml the app won’t build anymore unless you also add the icons to the locations mentioned in the config.xml. In our case you can get the icons from the zip file you downloaded earlier from github or create your own icons.
You could use this same approach to also replace the Cordova splashscreens of the app with your own custom splashscreen.
Configure Device orientation
You will find out later that the app works best in a portrait orientation, a mobile device does rotate the screen by default however and so does a Cordova app.
To fix this you can set the device orientation in the config.xml, for the icons we used an example with a different set of icons for android and iOS but you can also define settings which applies to both.
<preference name="Orientation" value="portrait" />In the above example you simply add an preference “Orientation” and set the value to “portrait”. You can add this line above the “<platform name=’android’>” section. If you would set it inside the platform sections you can have seperate behaviours on both iOS and Android.
This way the device won’t turn the screen anymore when you turn the device.
Build Cordova Project
Now that we installed a plugin to our project we first have to see if we can build the project for both Android and iOS. To do this we first have to tell Cordova which platforms we want to support (in our case both). Execute the commands below to add the platforms to your project.
# cordova platform add ios
# cordova platform add android
Just like you can add platforms this way you can also remove them with the "cordova platform remove <os>" command.
Now that we added the plugin and platform you can build your project for a specific platform so we use the following commands to build the project for both Android and iOS.
# cordova build android
# cordova build ios
On the android build you might get an error saying that the build failed due to some licenses which not have been accepted. To fix this go to your '$ANDROID_SDK_ROOT/tools/bin' directory (e.g. ~/Library/Android/sdk/tools/bin) and execute the command './sdkmanager --licenses', then review and accept all licenses. On iOS you might also get an license error and this one can be solved by running the command 'sudo xcodebuild -license', besides that you might have to set a development team in your project before the build succeeds.
Now your can run the app on your device, for android use cordova run android (make sure you enabled developer mode on your android device) and for iOS you can run cordova run ios –list to find the ID of your device and then use cordova run ios –target <deviceID> to run it.
Documentation of the plugin
When implementing a plugin you should always start with looking at plugin documentation. Most of the time this will be the github page of the plugin but for the most common plugins you can also find more detailed implementation documentation created by other developers. You find the documentation of our plugin here.
First thing we see is that you install the plugin with the command “#cordova plugin add cordova-plugin-speechrecognition”… Duh…. as if we did not know that already 😉
We are mostly interested in the “Usage” section of this plugin, it explains that you have a few api’s which you can implement in your application, the ones we are interested in are:
- isRecognitionAvailable
This one checks if your device does even have a microphone which the plugin can use. - hasPermission
When using a device feature as the camera or the microphone you always must ask the user’s permission. This method checks if the app already has permission. - requestPermission
If the app does not have permission to use the microphone then we can use this method to request the permission. Please note that when a user denies access on iOS you won’t get a chance to request permission again through the app. - startListening / stopListening
When the device is capable of using the microphone and we have permission to use it then we can use these two methods for the actual implementation of the plugin.
Our implementation of the plugin
So now you know which API’s exist for this plugin we can discuss how I decided to implement this plugin into our SAPUI5 project.
Component.js
In the Component.js I make sure that each refresh of the app will load the SplashScreen view through “this.getRouter().navTo(“splashscreen”)”.
SplashScreen.controller.js
In this SplashScreen I use the following code snippit in
if (window.hasOwnProperty("cordova")) {
  document.addEventListener('deviceready',this.onDeviceReady.bind(this),
false);
} else {
  this.getRouter().getRoute("splashscreen").attachPatternMatched(this.onDeviceReady, this);
}
This first checks if the window property contains a property named “cordova”, if this is not the case then this app is run through a web browser (or non supported device). When you are sure that your app only runs as a mobile app you could skip this check but I like to test the UI of my apps through a web browser as well which makes this check handy. When the app runs in a browser we register an event listener which get’s fired when the route “splashscreen” is matched which will be each time you navigate to this page.
If the window property does contain cordova then we do have a mobile device so we want to use the plugin api’s to check for the availablity of a microphone and the permission to use it. So in this case we register another event listener named “deviceready“, when this event fires we know that the device is initialised so that we can use the plugin api’s. If you do not check for this event you might run into an error when you try to access the plugin while the device was not initialised yet.
In both cases we run the onDeviceReady method though which navigates to our app’s main view named “Record” and it executes the method ‘_prepareSpeechRecognition’ from the BaseController.
BaseController.js
In the splashscreen we called the “_prepareSpeechRecognition” method, this method calls some of the Speech Recognition API methods. It uses promises to chain the requests so that they are executed in the right order. A local config model is used to store the state of the app (microphone available, permission allowed, etc) so that we can re-use that state in other parts of the app.
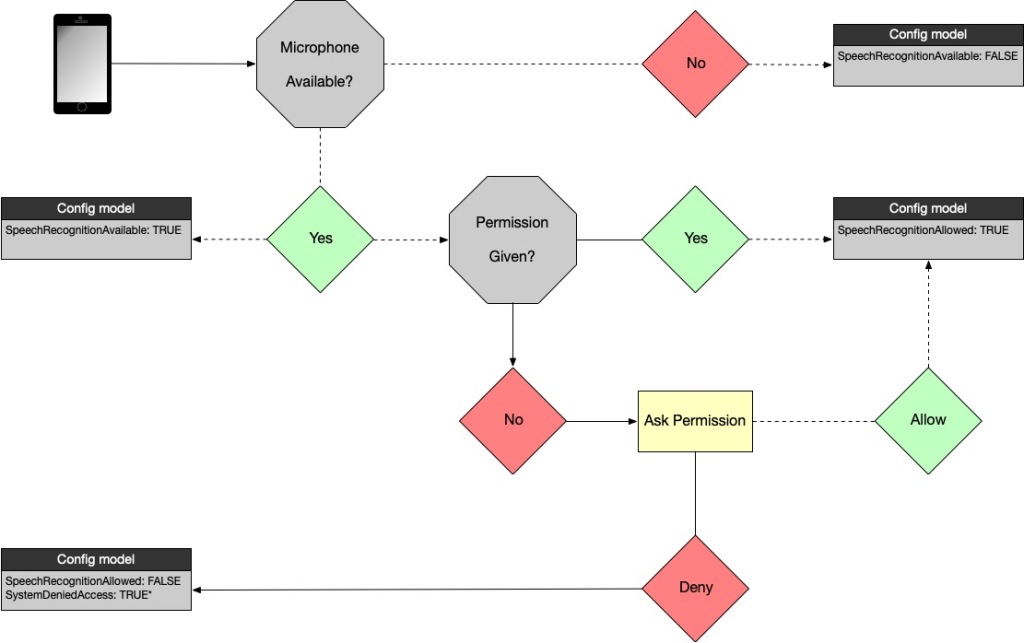
The BaseController first checks if there is even a microphone available otherwise it doesn’t even make sense to ask for permission so it will set SpeechRecognitionAvailable to false.
When the device does contain a microphone which can be used it will check if the app already has permission to use it. If it has permission it will set “SpeechRecognitionAllowed” to true, if it does not have permission it will aks permission to the user. When the user allows permission the “SpeechRecognitionAllowed” is set to true, otherwise it will set this value to false.
On iOS you can only ask once for permission, if the user denies access the system will automatically deny access when asking it again. On Android you can keep asking permission until the user checks the box “never ask again” and then the system also automatically denies access on each future request. For this reason we check the time it took to deny access if that is below 500ms then we can assume that the system denied access, so in that case we also set the property “SystemDeniedAccess” to true.
SpeechRecognition.js
Best thing to do with plugins is do the implementation into seperate files, this way you can easily implement the same plugin later into other projects saving you a lot of future work. So I created a file named “SpeechRecognition.js” under the www/util/ folder and added the following framework to it.
sap.ui.define(["com/noki_online/ui5app/util/SpeechRecognition"], function(SpeechRecognition) {
  "use strict";
  return {
    // code to follow
  };
});
On the location “// code to follow” I did the implementation of all the API’s of the plugin, I wrapped those in own methods which return promises.
checkAvailability
This method first checks if the window propery contains a Cordova property, otherwise it rejects the promise. If it does contain a Cordova property it checks if the plugin method “isRecognitionAvailable” returns true, in that case it resolves the promise otherwise it rejects it.
checkPermission
This method checks if the plugin method “hasPermission” returns true, in that case it resolves. If it returns false then it will call the “requestPermission” method (see next). The checkPermission will resolve or reject depending on the return from the requestPermission call.
requestPermission
This method will set the current date/time in a variable upon running, then it calls the plugin API requestPermission and resolve it when it went ok and rejects it on an error (user or system denied). When an error occurs it will get the current date/time as soon as it reaches the callback function, then it substracts the start timestamp from the end timestamp and rejects the promise with the text “SystemDenied” if the amount of milliseconds is less then 500.
startRecording
This method sets a few settings like the language, currently I set the app to listen for the dutch language but you change this property to “en-US” in order to support english. Then it calls the plugin’s API “startListening” and resolves the result upon success (an error handler has not been implemented.
stopRecording
Finally the stopRecording method calls the API’s plugin stopListening (without a promise). It doesn’t do anything else, this method is only required for iOS. On Android the listening automatically stops when you (and all sound arround you) stops talking, on iOS you have to manually send a stop signal. On both iOS and Android the app returns the result to the “startListening” success callback function when it stops listening.
Record.controller.js
All the magic finally happens in the Record controller file, the Record view contains big button to start the recording and a list showing all previous recordings.
When the microphone button is pressed it calls the “onRecordText” method, this first checks for the “SpeechRecognitionAvailable” and “SystemDeniedAccess” value on the config model. Then it calls the “_runRecordTimer” to start a time in the background to capture the time it took to take the note.
If the “SpeechRecognitionAvailable” value is not true or if the “SystemDeniedAccess” is true then we cannot use the microphone so we call a method named “_openManualInput” to open a dialog showing a text area where you can enter the text. Ofcourse this has nothing to do with Cordova but it makes developing and testing the app much easier since you do not have to deploy the app after each change to test.
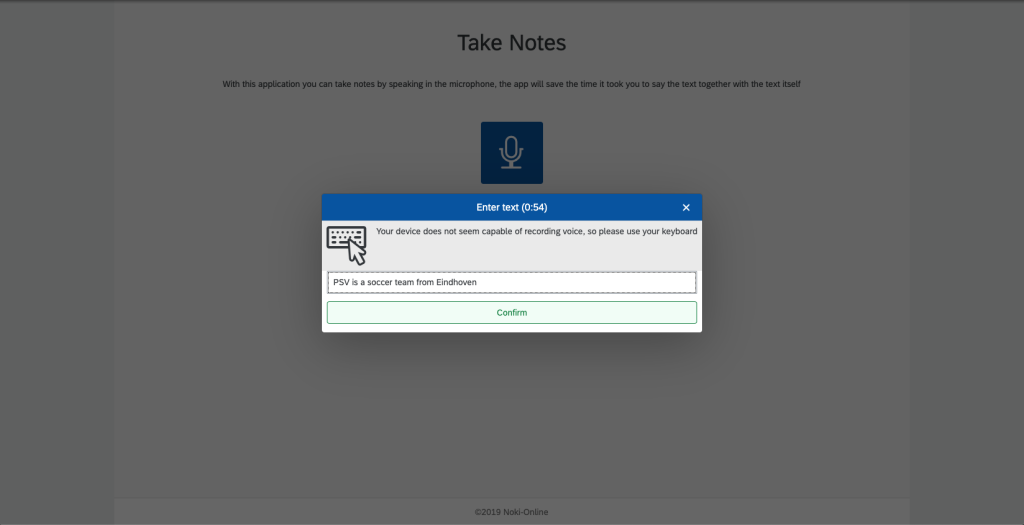
Otherwise we know that this is a mobile device and that the system did not deny access to the microphone. We do not know yet though if the user granted permission so for that we check the config property “SpeechRecognitionAllowed”. If this value is true then we call the _recordVoice method, otherwise we call the “_prepareSpeechRecognition” method of the BaseController again so that it can request for permissions again.
The “_recordVoice” method will call the Plugin’s API method “startRecording” which will finally add the result of the converted text to the local model through the method “_createEntry”. After that it is shown as the first item of the list below the record button.
Last words
I know this is just an simple example of how to use Cordova together with SAPUI5, however once you implemented one plugin it is much easier to implement others as well.
I have one more thing I’d like to show you before closing this topic though and that is a handy npm tool named http-server. As I mentioned before, I like to test the build of the UI through a web browser. One easy way to do this is by installing a tool called http-server through npm.
With this tool you can run your web application in the browser, just install it with the command “#sudo npm install -g http-server”. It is a global package (hence the -g) and after installing you can use it on all of your projects.
When the installation is finished you can navigate in the terminal to the root directory containing your web files (in our case the www folder) and run the command “http-server”. After that you can access the application in a browser through http://127.0.0.1:8080 or even through an local ip addres on your network.
More information about this tool you can find on the npm package page
I hope you enjoyed this walkthrough, if you have any troubles or questions just let me know.
Happy coding!

Leave a comment